Shopify Thank You Page Upgrade Deadline: 7 Steps to Protect Your Google Ads Tracking
Your Shopify conversion tracking could completely break on August 26, 2026. If you have been ignoring that urgent yellow warning banner at the top of your dashboard, the final countdown is officially on.

Shopify’s mandatory deadline to upgrade your Thank You and Order Status pages is less than two months away. You cannot treat this like a routine platform update that you can delay until the last minute.
This change is not a cosmetic layout refresh. Shopify is permanently turning off legacy checkout setups. We previously covered the foundational mechanics of Shopify Checkout Extensibility, but if you click upgrade today without auditing your data pipeline first, it could completely tank your tracking data.
This change isn’t exclusive to Google. It completely changes how all third-party attribution platforms and pixels for Meta and TikTok access your checkout data.
When your data drops, your ad performance drops with it. We have prepared this quick guide to help you audit your setup across these seven crucial areas before you hit that upgrade button.
Who is Affected and What is the Timeline?
The migration schedule depends entirely on your Shopify tier. While Plus stores have already transitioned, standard merchants face an immediate deadline on August 26, 2026. Legacy Thank You and Order Status pages will stop running custom scripts on that date.
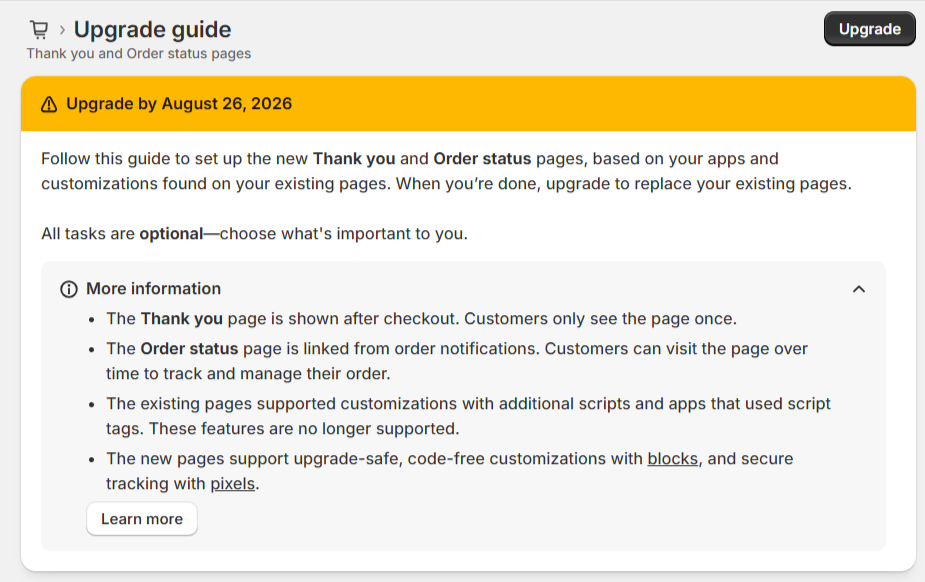
You are directly affected if your current store configuration tracks purchases using any of these traditional methods:
- Scripts pasted directly into the Additional Scripts box in your Shopify settings.
- Custom hardcoded modifications inside a legacy checkout file.
- A Google Tag Manager container snippet pasted into Shopify’s checkout.
What Changed?
Previously, advertisers could paste custom JavaScript snippets directly into the checkout page using the Additional Scripts box. This gave tracking tags direct access to the browser window and page elements.
With Checkout Extensibility, Shopify moves all tracking scripts into a secure, sandboxed environment called the Web Pixels API, also known as Customer Events. This sandbox protects user privacy and speeds up page loads, but it completely blocks traditional tags from reading the page directly.
If your Google Ads tags run on old scripts, they will simply stop firing on the checkout confirmation page the moment you upgrade. Therefore, your ad account will be ignoring all conversions.
7 Google Ads Tracking Settings to Audit Before Upgrading
1. Map Out Your Current Purchase Tracking Source
Before changing any code, figure out exactly how purchase data gets to Google Ads right now. Many Shopify stores have accumulated multiple tracking tools over the years.
Go to Settings and then Customer Events in Shopify. Cross-reference what you see there with your active live tags. Look at whether your conversions come from the native Google channel app, a custom GTM setup, or older hardcoded scripts.
2. Audit Your Additional Scripts Section
Legacy tracking configurations usually live inside the old order processing menu. If you inherited a store or work with multiple historical agencies, check this section carefully.
Look for any old snippets that contain conversion identifiers, transaction values, or order currencies. When looking at your tracking configuration, Shopify will show a clear warning if old scripts are running alongside newer app extensions. To avoid counting transactions twice, you have to disable these old scripts the moment your new pixel setup goes live.
3. Check the Source of Your Primary Conversion Action
Log into Google Ads and navigate to Goals, then Conversions, and then Summary. Find your primary purchase action and look at the Source column.
If the source is Website, your conversions fire from a tag on the site, such as GTM, a global tag, or the native app channel. If the source is Google Analytics 4 (GA4), you are importing transactions from your analytics property.
Pro-Tip: We usually recommend setting up two separate purchase goals in Google Ads for our clients. Set your cleanest direct tracking method (like the native Google App Purchase) as your Primary conversion action. Then, set an alternative method (like a GA4 import) to Secondary. If your primary tracking ever breaks during a major platform update like this one, you can immediately cross-reference it against your secondary backup to see exactly where the data is splitting.
4. Verify Enhanced Conversions Performance
Enhanced Conversions are essential for matching customer data securely back to ad clicks. This relies on things like hashed emails and phone numbers.
Because the new checkout places customer data inside a sandbox, old JavaScript variables designed to scrape form fields for Enhanced Conversions will no longer work.
If you use the official Google & YouTube App, it hooks into the Web Pixels API automatically to pass these signals securely. If you use a custom setup, you will need to update your data layer to listen to Shopify’s new sandboxed standard events instead.
5. Review Google Tag Manager Triggers
If your purchase tracking relies on GTM, you cannot just leave your container running without updates.
On standard Shopify plans, regular GTM scripts cannot execute inside the secure checkout sandbox. To keep using GTM for purchase tracking on the new thank-you page, you must send events via a custom Shopify Web Pixel or implement a server-side tracking gateway.
Review your GTM triggers. Any trigger depending on page loads or page elements will stop working.
If you are using GTM to deploy standard Google tags, keep in mind that Google actually discourages using Shopify’s custom pixels for them. Instead, you can follow Google’s official guide on migrating your tags to the native Google & YouTube app to ensure your tracking matches their supported ecosystem.
6. Clean Up and Eliminate Duplicate Tracking
Data inflation can easily happen during a migration. This happens when a merchant connects the native Google & YouTube App channel, but forgets to remove old tracking scripts.
This makes a single transaction fire twice: once via the new app pixel and once via the legacy script. Your ROAS will look great on paper, but your actual business reporting will be distorted, causing Google’s smart bidding to optimize for incorrect conversion values.
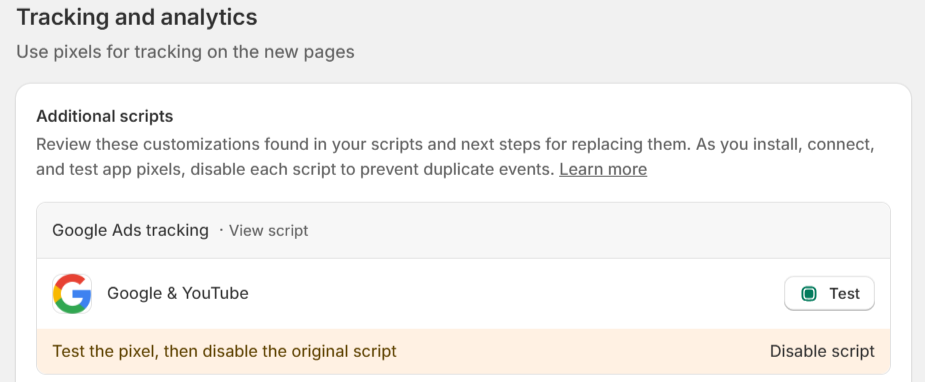
7. Run a Real Test Purchase
Never assume a tracking migration is complete just because the Shopify interface displays a green status icon.
Once your settings are aligned, place a test order. Follow the transaction path inside debugging tools to confirm that the transaction ID passes through accurately, the currency and total revenue figures perfectly match the Shopify checkout order details, and no duplicate tags fire on the confirmation screen.
Protect Your Smart Bidding Data
The new Shopify checkout architecture offers great performance advantages, providing faster loading speeds and a more secure checkout flow for your customers. However, it requires a careful tracking migration strategy for anyone running paid media.
Automated bidding strategies depend on consistent, high-quality data streams. Missing or duplicated conversion data can quickly lead to unstable ad performance.
Invest time to carefully audit your tracking ASAP. It is far easier than troubleshooting broken data systems after the upgrade window closes. We are now less than two months away from a total shutdown of legacy checkout architectures.
If you want to bypass browser-side sandboxing limitations entirely and are looking to set up third-party server-side tracking, check out our step-by-step guide on how to implement server-side tracking using Stape.io.