

Outsmart the Competition in Google Search
Are you a new brand in a highly competitive ecommerce space advertising with Google Ads? Getting traffic doesn’t seem to be a problem, but non-brand search campaigns just won’t convert.
Non-Brand Search Campaign: Other keywords that don’t reference the brand name are considered “non-brand keywords.” A non-branded keyword search query does not include your brand name, including any misspellings. Most importantly, these visitors may not already know about your brand and are searching for your product or service.
You’ve done your keyword research, got all the right ad groups and structure in place, nailed your ad copy, and connected all your accounts. So, why is the damn thing just eating all your budget, and generating little to no revenue in return!
Table of Contents
- Competitive Landscape
- Google Ads Reach
- Google Ads Automation
- Optimizing Google Ads Accounts
- Things to Note Beforehand
- The Steps to Take
- Layering Locations
- Still Not Working?
Competitive Landscape
Chances are the keywords you’re going after are highly competitive, but you knew that already due to the highly competitive nature of your industry. Before you go back to the drawing board and start building a new campaign, what if I told you there was a way to outsmart the competition.
Haven’t even created your campaign yet? Check out this article from Google on how to lay the groundwork for a successful campaign on Google, using the keyword planner tool.
Google Ads Reach
Given the overall reach available through Google Ads (in 2020 Google accounted for 75% of search share, consumers make more than 160 billion searches per month on Google alone), it’s not hard to spend a lot of money very quickly without reaching your target audience. There are relevant customers out there, you’re just not finding them.
Google Ads Automation
The consistent message being touted by Google these days is to trust automation. Don’t get me wrong we have seen excellent results from using the new Smart bidding solutions that Google has and continues to launch. But, just following these bidding strategies blindly can get you in trouble. As advanced as Google’s algorithms are, sometimes they just don’t perform like you want them to, or as originally advertised.
So now you are a crossroads and have two choices. You can sit on your hands spending more budget, hoping that things magically turn around OR do some proactive ad account work, and turn this into a profitable campaign.
Optimizing Google Ads Accounts
Anyone who has worked with Google’s ad platform will know that there are a dizzying amount of levers to pull to manage ad campaigns. But as Google migrates more and more towards automation, slowly removing certain controls from advertisers, it’s very easy to get into the mindset that there isn’t value in optimizing your ad account.
That couldn’t be more wrong, though! I’m going to list out a few different tactics for Non-Brand Google Search campaigns that you can use to reach the customers you are looking to acquire. Think of this list as a way of setting both yourself, and your campaigns up for success.
These tactics will add additional layers of structure to your campaigns beyond what automated bidding strategies have to offer.
Things to Note Beforehand:
More data = more money
As soon as you launch a new campaign start adding observable audiences like nobody’s business. The data you will generate from this is so valuable! There is literally no limit to the amount of audiences you should add in your pursuit of customer data. For more information on different ways to utilize audiences check out this article I wrote about leveraging Facebook audiences in Google Ads. As you’ll see below, having this data is also critical to the potential success of your campaign too.
Don’t have observable audience data?
No problem! If you have Google Analytics Audience Interests setup then you can use In-Market or Affinity Audiences instead. Select the most relevant audiences by navigating to the following page:
- Click Audience > Overview > Interests > Overview.
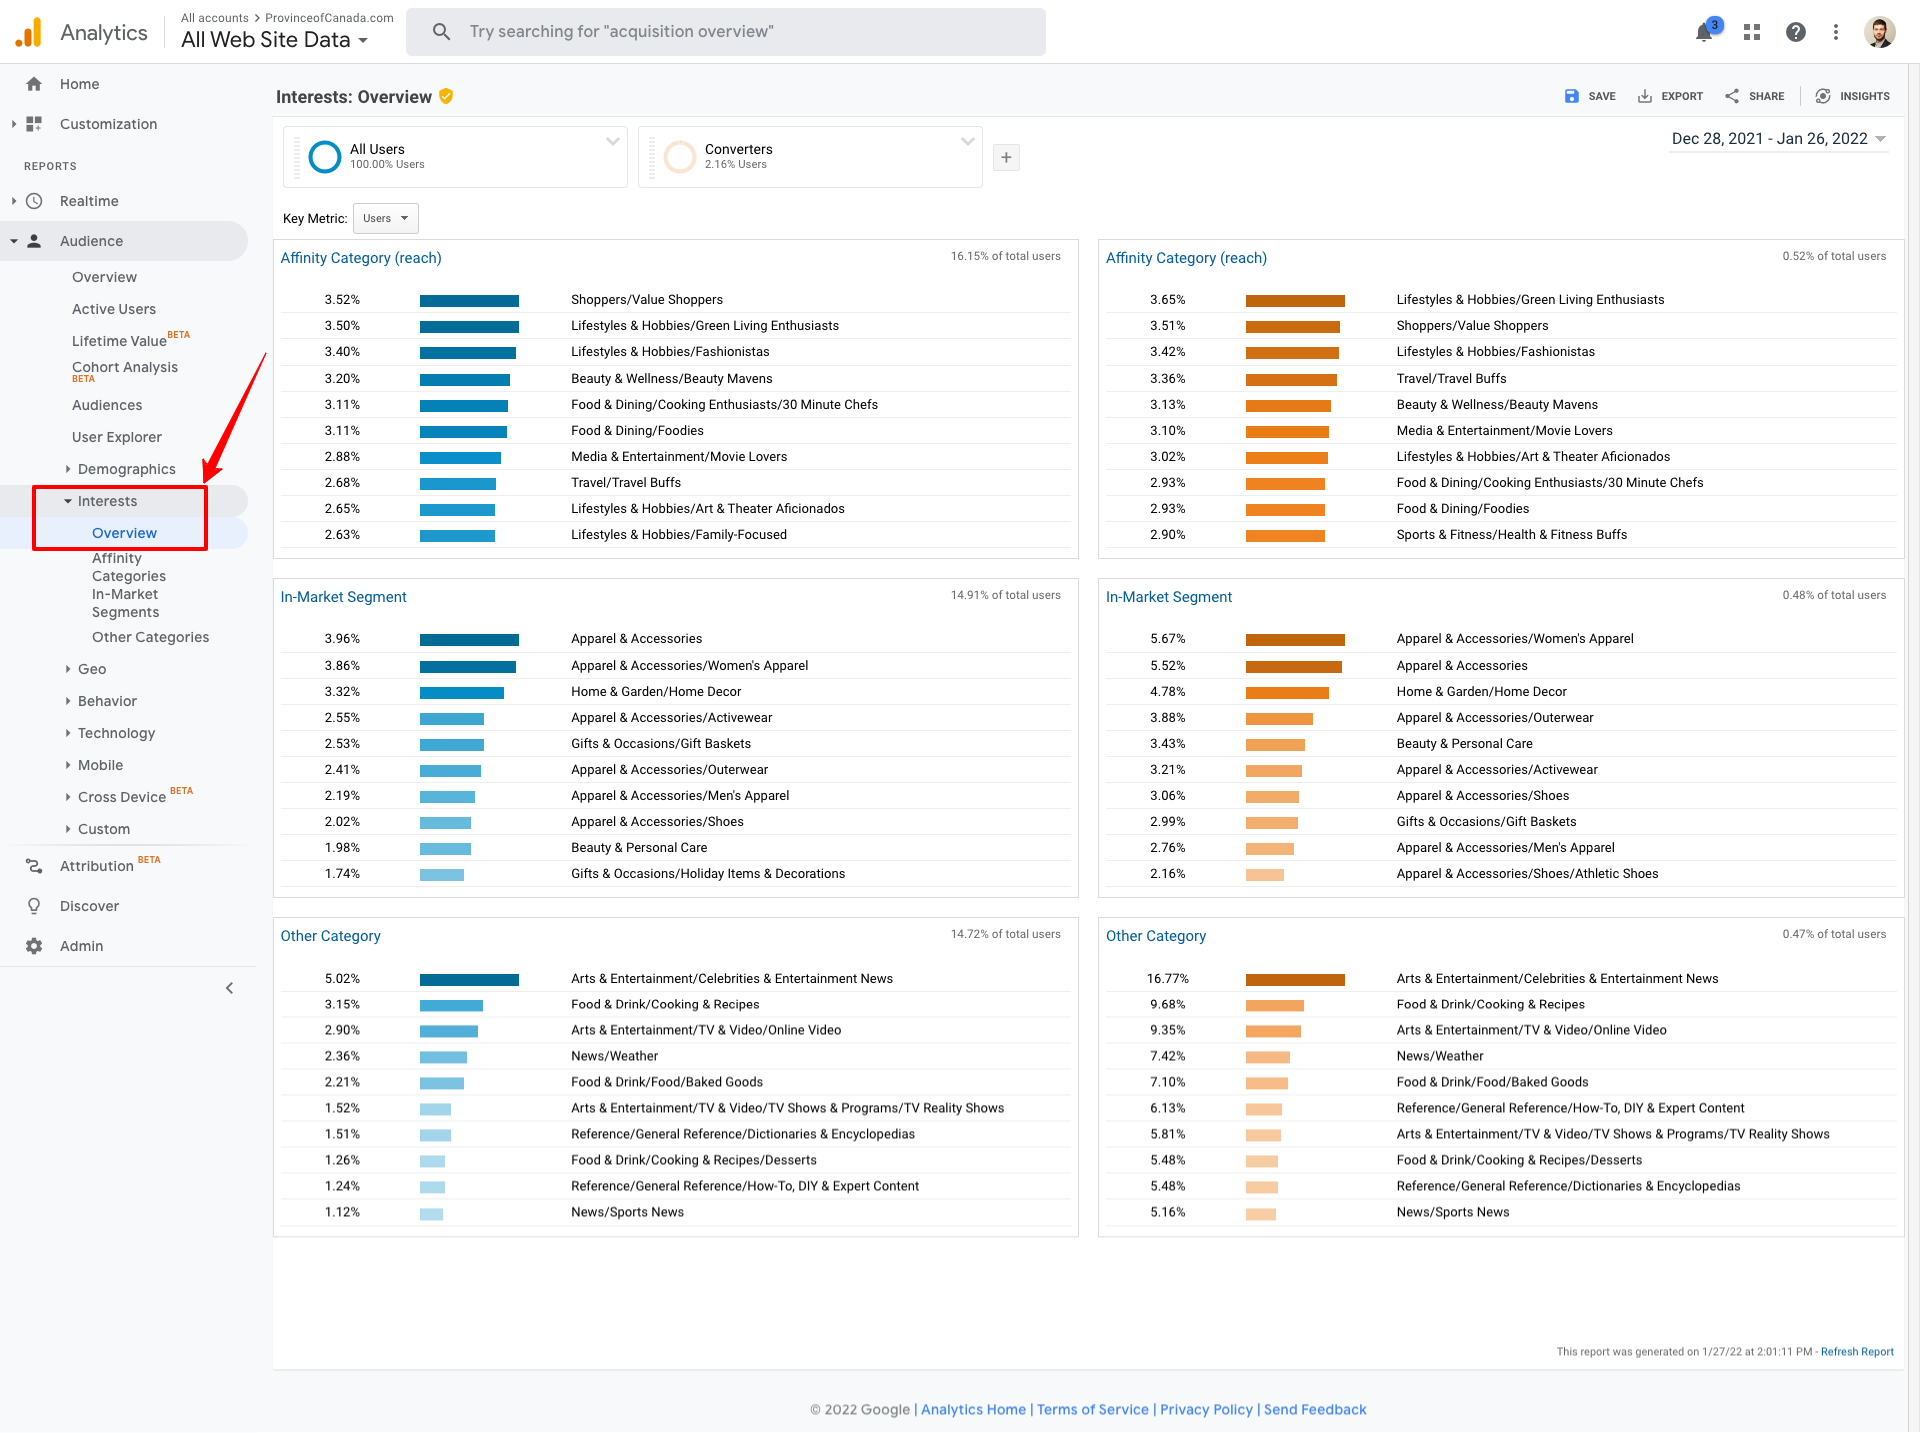
2. The default segment will be set to “All users”.

3. For additional insight into performance add “Converters” as an overlapping segment.

Now you’ll be able to see which Affinity and In-Market Segments apply to a large majority of your website visitors/customers.
The Steps to Take:
As previously discussed each of these steps are actions you can take to create more profitable campaigns. You don’t necessarily have to implement everything at once. You may want to take a phased approach, to see how each step affects performance. So without further ado here are the steps.

Layering Target Audiences
As previously highlighted the more observable audience data you have the better. In some cases you’ll be surprised by the audiences that produce results. To select the best audiences to use, utilize the following column KPI’s in the Audiences tab:

Add column edit tab in audiences screenshot
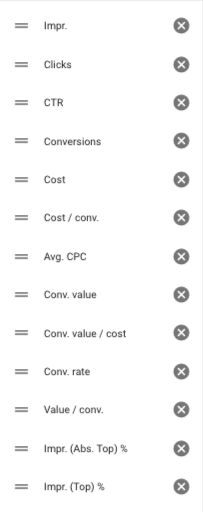
Then once you’re set up here’s how the data should look:

Note that the Account view is currently selected (highlighted above), giving a high level overview of audience performance. By default Google will revert to Ad Group level. Choosing a view depends on the size and structure of your account. In this example the account is relatively new, in a highly competitive industry (phone cases and accessories). The brand has a limited number of SKUs for a single phone brand, so it’s safe to assume that the data shown in the account view is going to be reliable. Try to apply this logic when thinking about your own account.
Identifying Target Audiences
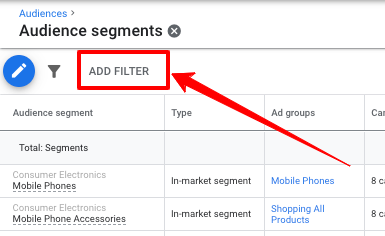
Depending on how much conversion data you have you may want to remove brand traffic, which can often skew data.
- Click Add Filter
2. Select Campaign
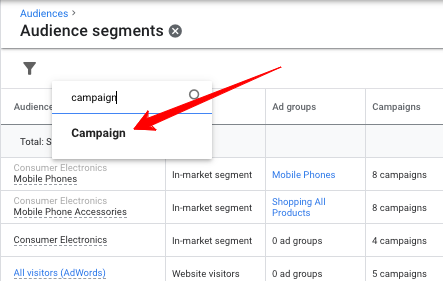
3. Select everything except brand campaigns
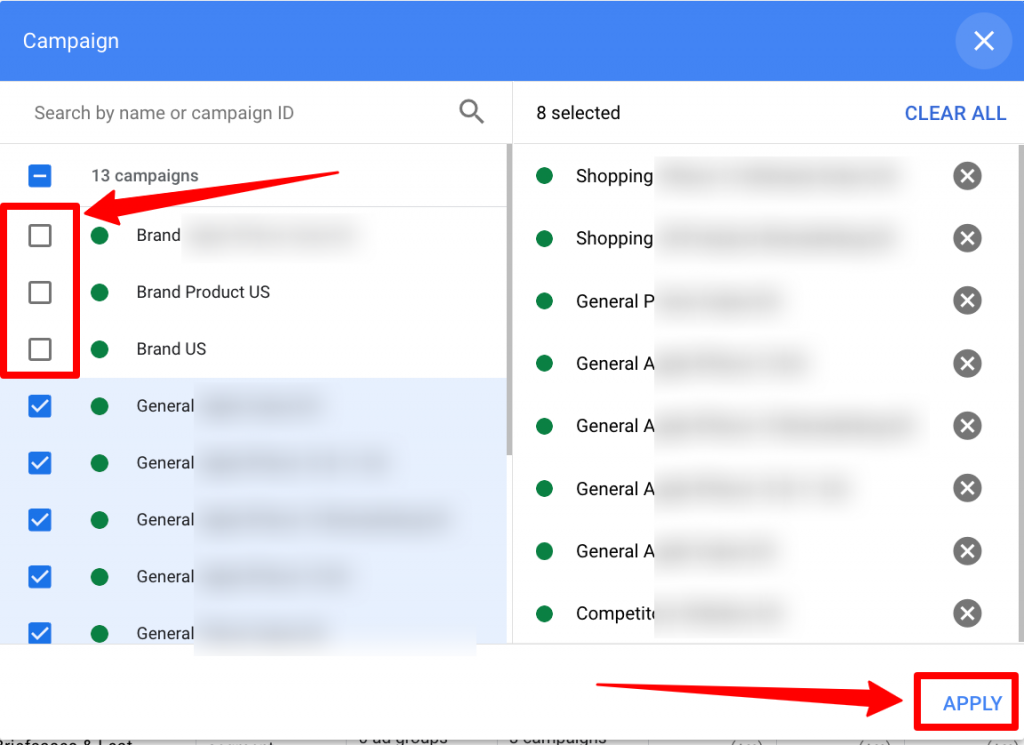
Then you should see a fairly significant difference in how the results look. You’ll probably have less conversions, but non-brand traffic is what we want. Now you have a clearer understanding of your top performing audiences.
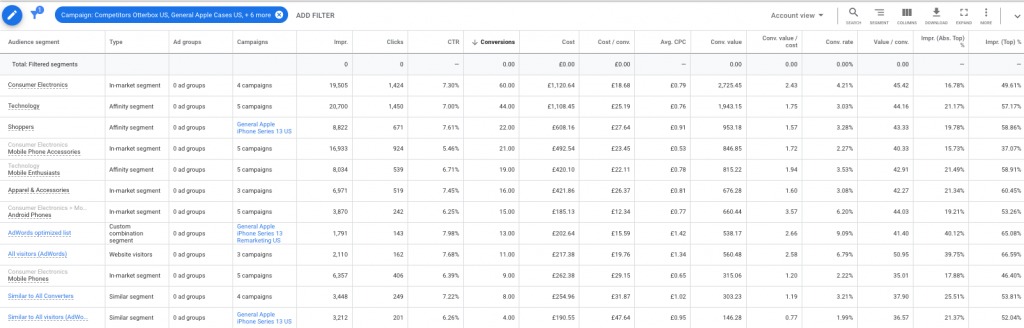
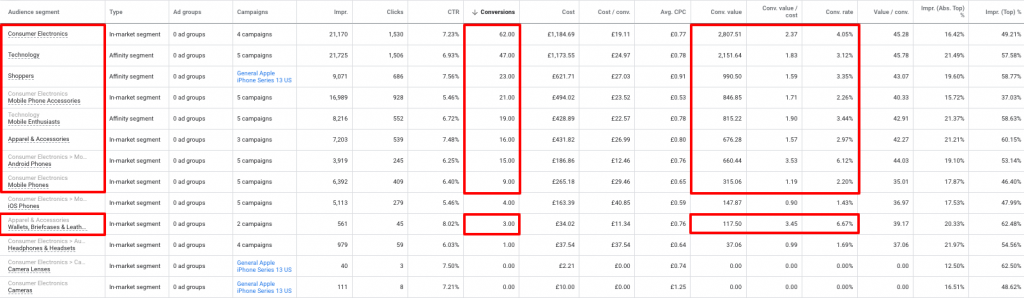
Above I have segments sorted by number of conversions. You could also organize them by Conv. value / cost (ROAS), but just make sure that at least 5 conversions have been achieved, a good sign that it wasn’t just a lucky sale or two.
Finally make sure you have In-Market and Affinity audience types selected. That way you won’t get mixed up with remarketing or similar audiences:
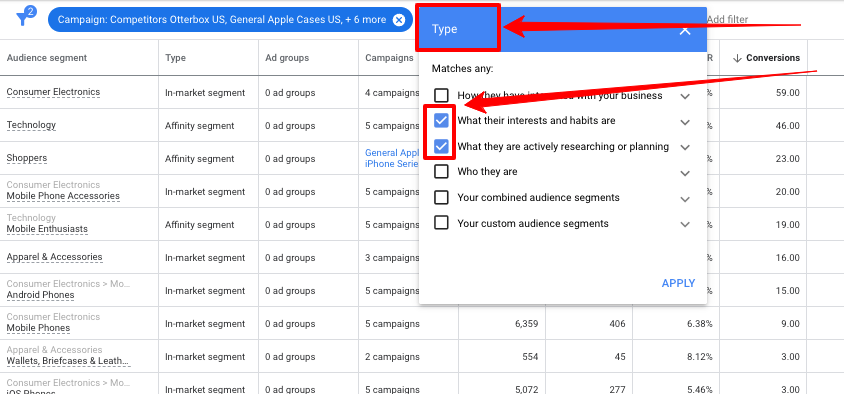
Finally your table of data should look just like this:
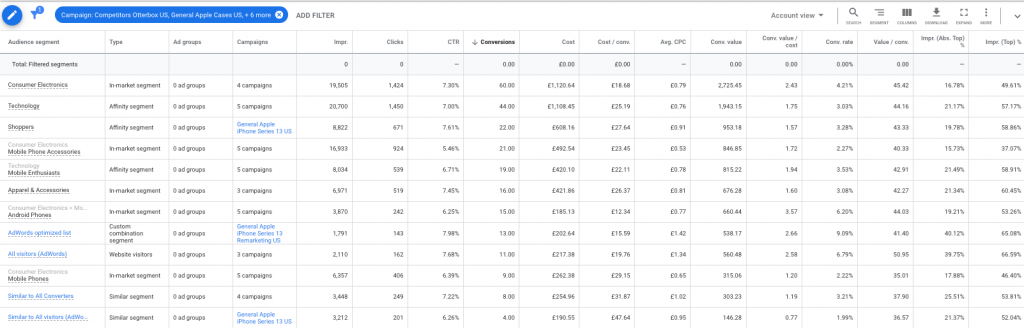
Below I’ve highlighted the KPI’s I took the closest look at when selecting these particular segments. Wallet’s, Briefcases & Leather Goods is a close call due to the lack of conversions, and only 2 campaigns being active, but this is also a good reminder to add this segment to more campaigns too.
Adding Target Audiences
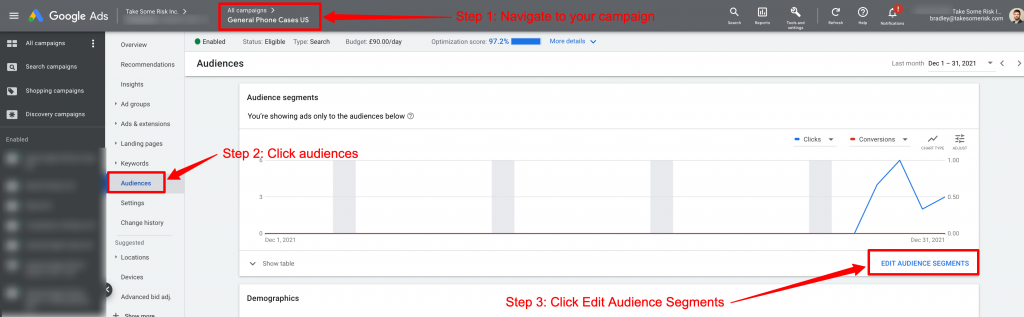
- Once the best audiences are identified, navigate to your campaign, then to the audience page again. Start by selecting your segments and clicking edit audience segments.
2. Make sure Targeting is selected:
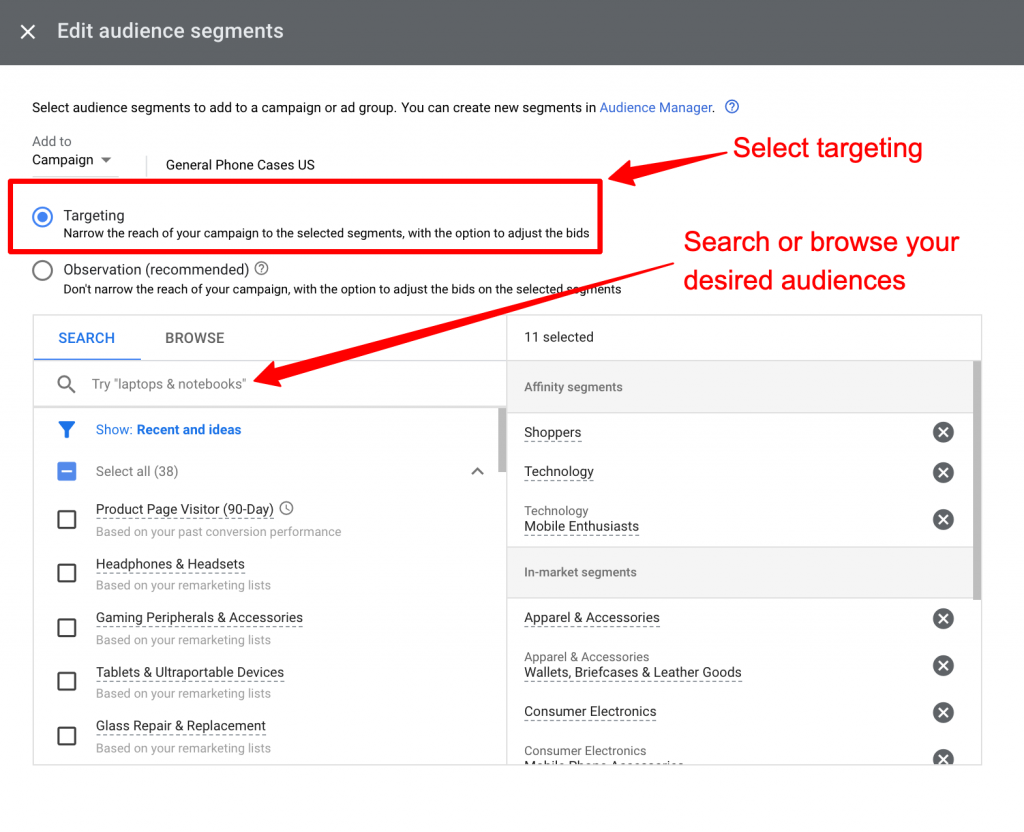
Once you select an audience it will show up on the right hand side as shown in the screenshot. Click Save when you are done. Now, all your traffic for this campaign will be targeted towards these audiences!
Audience Bid Modifiers
Now for the next step that can further increase your audience segment performance. It will need at least two to three weeks worth of data before implementing, to ensure you can make informed decisions. Also ensure audience segments are running alongside in other campaigns too to capture more data.
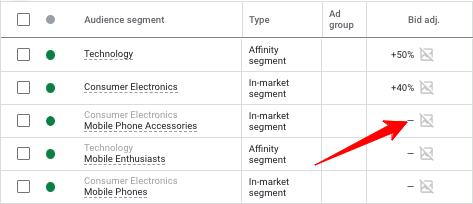
See the screenshot below to see what actionable data could look like:
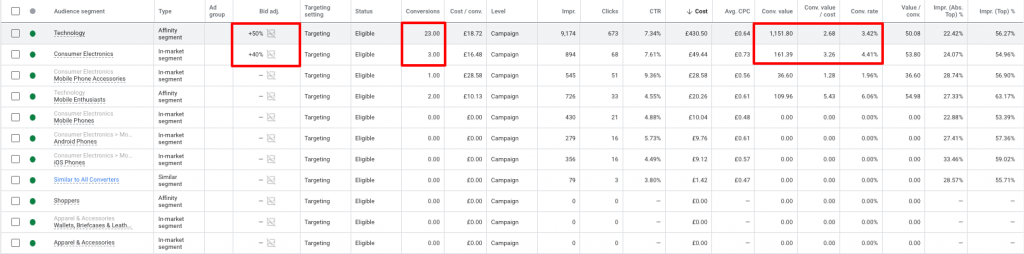
Notice the top two segments highlighted with increased bids, this data was taken from the last 30 days. Both have at least 3 conversions, significant amounts of traffic, and ROAS over 2.5. You may want to be stricter on your minimum ROAS, but that depends on your overall ad account target.
But what percentage increase do I choose?
Great question! For Bid adjustments, go big or go home. Anything less than 30% isn’t really going to move the needle, but just make sure you’ve got the data and results to back up the increase. On average I typically use 50% for top performing segments. I chose 40% for Consumer Electronics due to the relatively low number of conversions.
Identified top performing segments? Here’s how the adjustments are made:
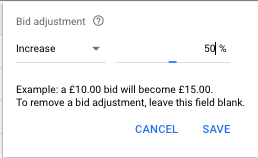
Like any significant changes you make to a campaign, you’re going to want to monitor things closely. Set a reminder to check performance in a few days, just to make sure you’re not overspending on one of the audiences.

Layering Locations
You can also limit your campaigns reach to specific cities or states, depending on how much existing data you have for location performance. This potentially enables you to maximize revenue in these areas.
For this example we’re using locations within the US, but this tactic can be used globally too. It depends on the available market size of each area, and if there is enough traffic to make segmenting worthwhile.
At Take Some Risk we like to organize locations beyond all states. We also add in major cities: NYC, Chicago, LA, and SF, which helps us to bid differently in urban areas.
- Locations can be added in bulk through the Google Ads Platform:
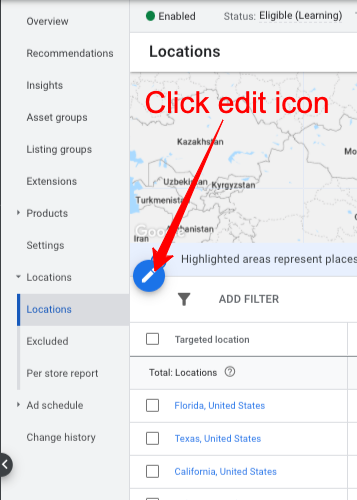
2. Then you are taken to the following form where you can paste all the locations you want to target:
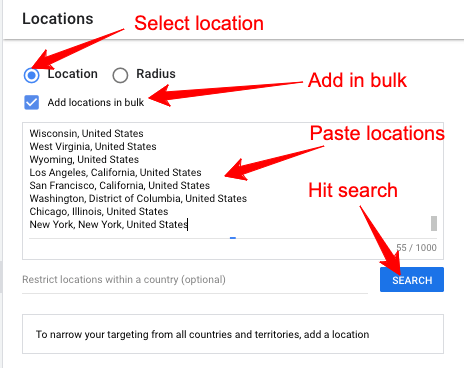
3. After you’ve hit search all the locations will be populated as options to target:
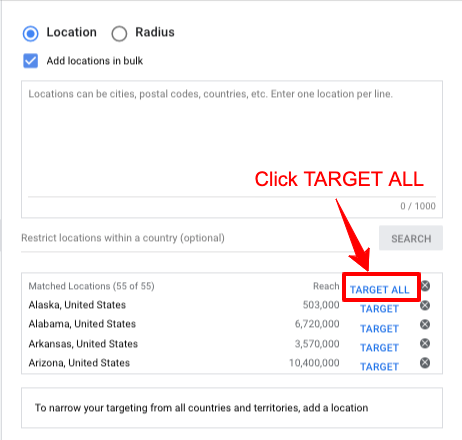
4. Once added finally make sure you save everything:
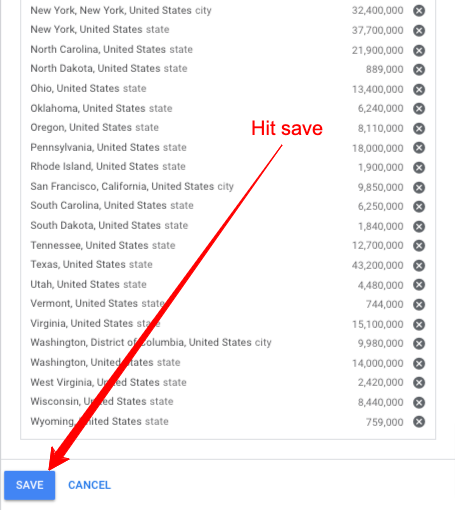
Locations can also be added in bulk through Google Editor too, which is often a lot quicker.
Here’s the list of US Locations we typically use:
Selecting the Locations
Typically your going to have this kind of data in more than one place depending on what kind of analytics/ad platforms you are running. Google Ads is a good place to start. When you’re logged in, simply navigate to Locations as shown below.
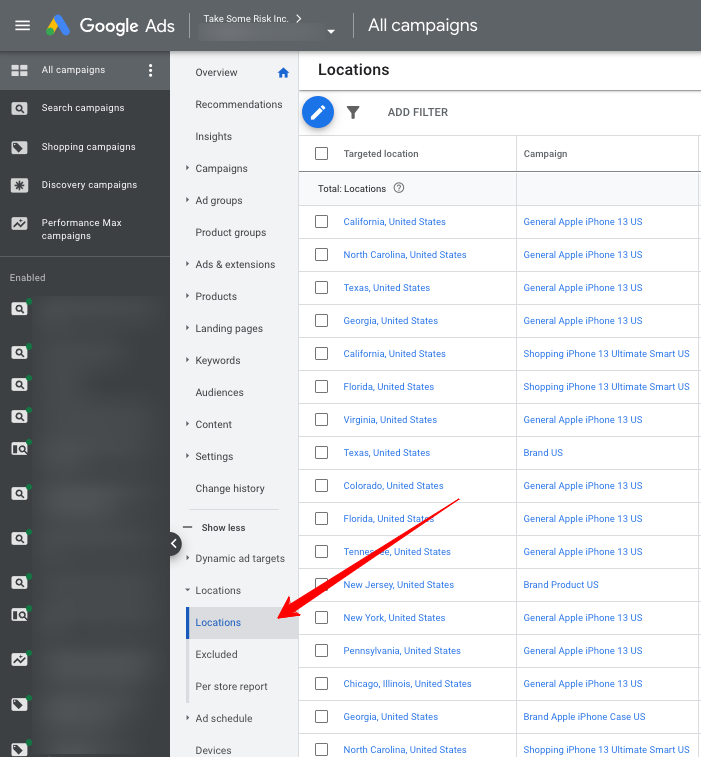
Then as long as you have locations organized by all states, and major cities, the data should look just like this:

If you don’t have enough location data in Google Ads to make a strong enough decision on which locations to choose then head over to Google Analytics:
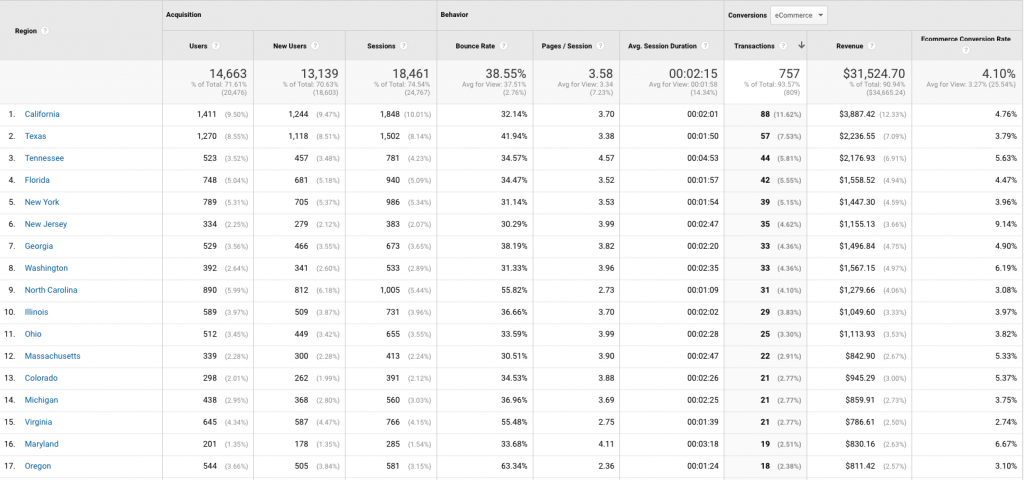
Following the clicks steps below: 1. Audience > 2. Geo > 3. Location > 4. Then click in to United States
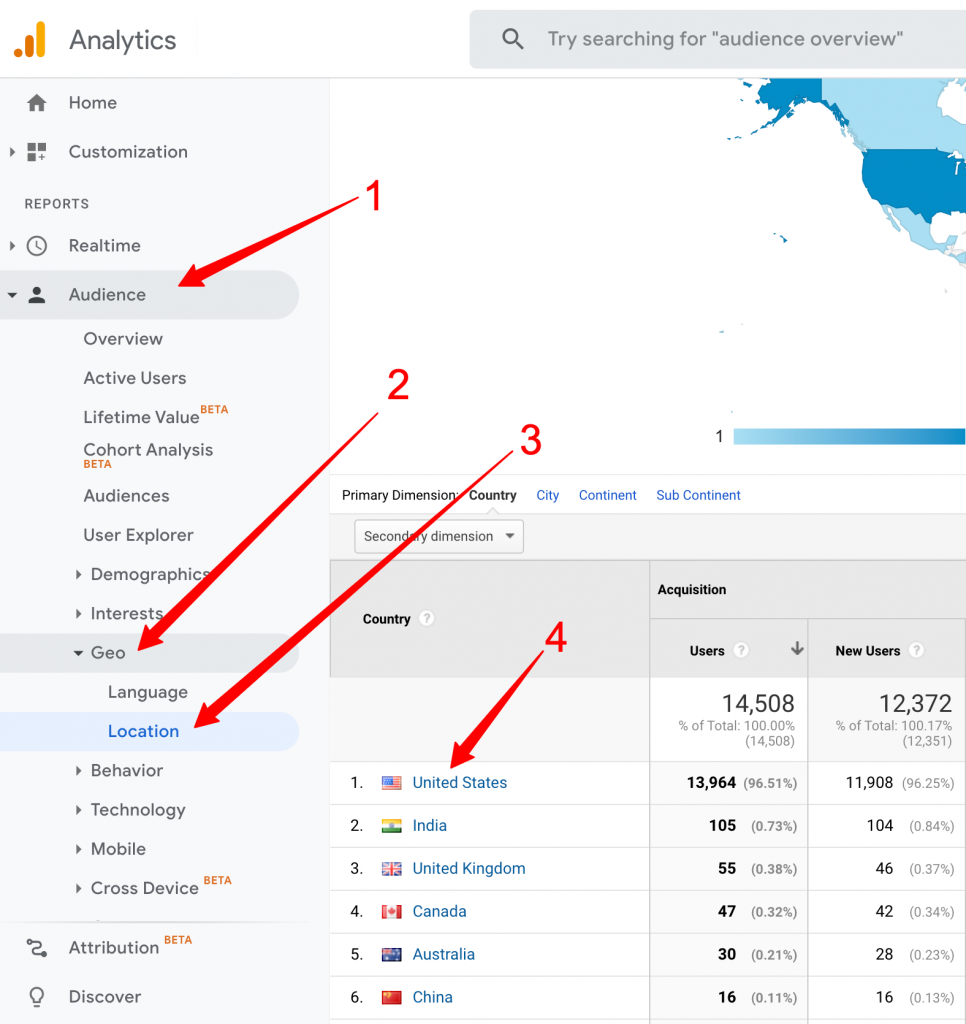
This will then lead you to the following breakdown of location performance by US State:
Picking the Right Locations
Much like when we were selecting Audience segments, choose the clear winners and consider traffic volume. I’ll take a highly converting campaign that generates less traffic most of the time, but make sure you have enough traffic to make all this effort worth your time.
Once you have chosen which locations you’d like to use, repeat the steps you took earlier and add them in bulk to your campaign. Ensure that they are the only locations being targeted.
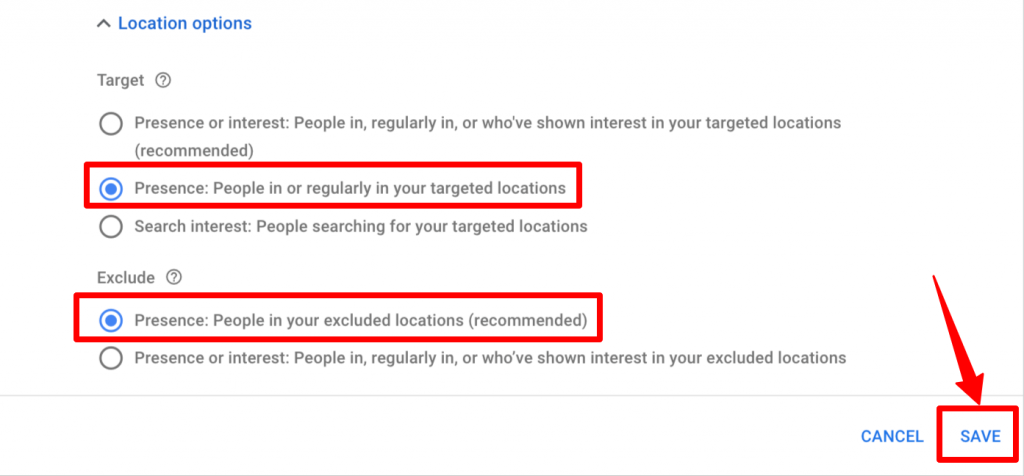
Finally make sure your Targeting & Exclusion methods are set correctly
To ensure you are only targeting the locations you specify you need to ensure Targeting methods are set up correctly.
- Click Location options
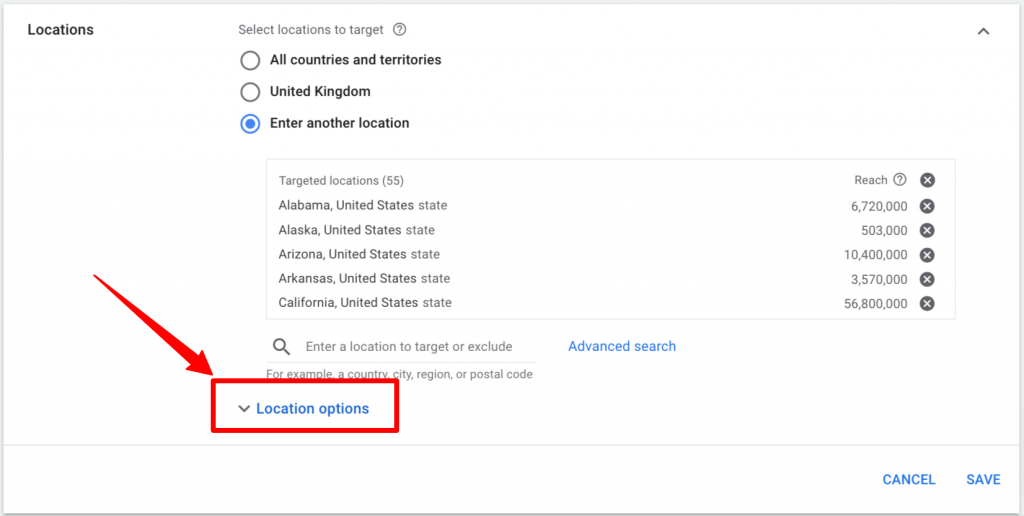
2. For Target select “People in or regularly in your targeted locations”
Still Not Working?

So you’ve leveraged everything above and things still haven’t worked out. Not the end of the world. Since your campaign has now probably been running for around a month, it’s highly likely that you now have a lot of data that you didn’t have before you started. So, how can you use this data? Try to think about the following:
- What worked well? Were there any keywords or Search terms that generated conversions, or had a high CTR? Perhaps you could build new campaigns or ad group themes based on these keywords
- What didn’t work well? If performance was really bad you might need to avoid certain keywords/search terms so add these as negative
- Perhaps there’s an issue with the landing page? If Conversion rates are really low then make sure there isn’t a problem outside of Google ads that is bringing performance down.
- Take a closer look at Google Analytics to see how this campaign performed against your average website KPI’s
Of course I hope none of the last paragraph’s bullet points apply to your campaigns. I hope that this comprehensive guide helps steer your brand and product in the right direction, because the competition is fierce out there, and it’s not letting up anytime soon!
Please feel free to share your results and learnings in the comments section for further discussion.
